Krox and friends

Two completed 5th edition Kroxigors from Games WorkshopAnother weekend and another bit of work on the Lizard army. After spending some time with the 'completed' Kroxigor model this week, I decided there was nothing wrong with gilding the lily and worked back into some of the painted model and base to dress him up a bit. There is more flora and some highlights that helped flesh out some of the geometry of the model.

No one should be alone in the world, so the Krox received a friend - another 5th edition model in the same painting scheme and with similar basing elements. I wanted these guys to have a naturalist feel to them and was thinking of a dense and humid Bornian jungle during their creation. If these guys don't look hot and muggy, let me know.

"What are those objects in front of them," you might ask? Huge, delicious, powdered donuts...

or a way to track wounds! My original idea was to create a flower stem on its own 20mm base onto which green-stuffed flowers could be placed to track wounds, but I eventually decided to make the counters a part of the model. I think it works - pleasing to the eye and functional... just like my wife. Can't do much better than that.

Two completed 5th edition Kroxigors from Games Workshopclose up of wound counters for Kroxigors
Below is a shot of the pair with their skink contingent. This is nearly the formation they will take on the tabletop per the new Lizardmen codex rules. The final unit will have 16 skinks.

Kroxigor and skink mixed unit

One Cool Krox

I spent the Valentine's weekend with two things I love: My wife, and an 11 year old model of a foolishly named lizard-creature: the Kroxigor. One of those two is tucked into bed with me every night, and the other will do the dishes every now and again if I ask sweetly.

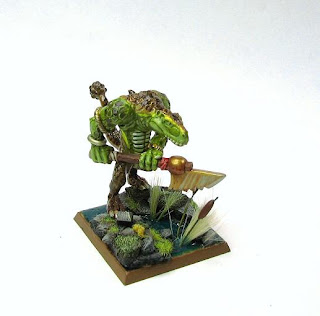
This is the model that was destined for the product of 'Basing 202'. Again, I wanted the model to be based in the natural world and referenced a number of my photos from the local zoo before deciding upon a hybrid alligator/iguana color scheme.


Fully Painted 5th edition Kroxigor

A Poor Man's Oven

I'm impatient and I use modeling epoxy frequently. I also have a bad habit of sticking my thumb right into a painstakingly crafted sculpt that is not yet dry. Are you in this boat as well? No!?... Then go hang out on this website with my wife: (i like to party)


For the handful of you not distracted by the lifestyles of the wealthy and woebegone - I present to you, a can. This will become our oven and mine originally held 30 oz of beans. If you can still find coffee in one of these, buy it, throw out or freebase the contents, and get to work.


photograph of Midloo wearing respirator

Is that Darth Vader's nerdish brother?

Safety first with projects like these. I'll be using a rotary tool to cut into this thick can and the fumes and flash can get unpleasant. Respirator and cool-goggles are a must. See here for the repercussions of doing this with another in the area.

I want a door for my creations and a vent for the heat - this cut will accomplish both.


Finally, a cheap-o incandescent lamp is mounted above the can. Voila! One poor man's oven. The heat can be controlled by moving the light source away from the can - what a feature! I find that positioning it about 2" above the lid and cooking for 10 minutes gets the piece to the point that an errant finger won't mangle a fresh sculpt. Be careful - too much heat and your greens can melt.

Don't try to heat up any nachos in here after baking your epoxy sculpts either. That's not healthy.

Basing 201

The tried and true bases made of sand, painted in increasingly lighter brown colors, and finished with a hint of static grass are a functional way to dress up large numbers of core units. You can see some examples of these in the Dwarf of my earlier posts. I wanted to add more interest and higher relief to the bases of the larger critters in my Lizardmen army. What follows is a step-by-step walkthrough of how I tried to accomplish this - missteps and all. Follow along and succeed where I half-succeeded, intrepid reader!


Here's the Kroxigor on the table today. The pose and bulk of these older 5th edition models is great. Looking at the model gave me a sense of how I wanted the scene to play out. The mini seemed to be asking for some space to look menacing, so he was placed in the back corner.


Taking a fine Sharpie in hand, I next drew out a map of where key elements in the base would be situated. Not look like much yet? Stick with me!


Taking a step sideways, I decided that some bits of ruined civilization might look nice out there in the jungle. Time to make some cobblestone. Green stuff was flattened out on a piece of glass with a bit of Vaseline underneath to keep from sticking.


This was scored with a knife and beaten up a bit to look more weathered. Just push in the corners of some stones and make some dents here and there.


I like to use natural rocks and you can see some bits of slate arranged along the lines that were drawn. These are glued down with super-glue and covered in some air-drying clay where I didn't want the tops of the rocks jutting out.
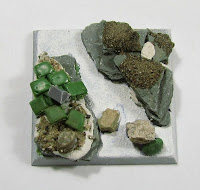


After the green stuffed cobblestone sheet has cured, some pieces were broken off and incorporated into the base. I wanted them to look a bit sunken into the landscape, so some more clay was built up around them.


One of my favorite new basing elements was also employed beginning in this picture: moss! The three piles of fine sand glued to the top of the right-hand rock formation might not look like much at the moment, but they will bloom into something much more interesting shortly.
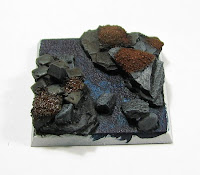


In comes the priming. The rocks and cobblestone have been painted a flat black, and the moss a deep brown.


The rocks are beginning to come alive with some lighter and lighter shades of grey. I start with a medium gray that's applied liberally, and work up to a shade closer and closer to pure white, highlighting smaller and smaller areas on the rocks. Think of where light would naturally be hitting the features of your base and focus on lightening those parts.


This was the first time I tried water effects. I originally thought a deep blue base would be appropriate, but changed my mind mid-stream (ouch! I know I know) and switched to brown. Ahhh... much more fitting for a little river.

The moss is looking good after being drybrushed in greens. They begin with a deep forest green and finish with a very light shade that is about 75% white and 25% green. Allow each layer to dry in between applications and paint an increasingly smaller area as you move up. This moss has about 5 passes in it.


Next I did some tests on the color water I wanted to use. Only a very small amount of paint is added. I touched the tip of a size 1 brush into the color I wanted and mixed it into a dollop of product about the size of a half-dollar. Both of the colors depicted above looked great to me, so I tried to incorporate both into the little stream. My idea was to place one color at each end and seamlessly blend them into each other in the middle.


Here you can see the result: meh! The brown base seemed to mute the effect (and I believe it is even further muted by the photograph). It was apparent, but very subtle. As the material dried, it became more clear and did have a really beautiful translucent effect as you looked through the water into the riverbed. While the 'water' was still wet, I placed some tall grass into the mix - this is a useful product, but can be a bit clumsy with which to work. A pair of tweezers is very helpful.

The stream seemed a bit shallow after one pass, so I did another with the same blue-tinted composition. This took away the nice effect of being able to see the riverbed - my greatest regret with this piece. On the next attempt, I will use a less intense blue paint in the mix, and less paint in general.

That being said I'm very happy with the way this first effort turned out. The base was dressed up with some cattails and some clump foliage.


A weak stream.. just like grandpa


Stay tuned for the finished piece- Kroxigor and all.

Dwarven Battle Company

The stunties are ready to strut their stuff on the tabletop. These minis will be incorporated into my Battle Company games in Lord of the Rings. My goal was to create a visually cohesive force comprised of individually recognizable Dwarves. Battle Company rules allow for a lot of customization and after a number of games, these guys started to flesh themselves out as real characters. I wanted their painting to reflect that and allowed their development in the game to inform their finished appearance.

Dwarven battle company from Lord of the Rings Strategy Game

A flock of midgets
There were opportunities for some fun little conversions. One of my company seemed to use his shield better than others, so I highlighted that by lopping it and his hand off the front of the model and moving the shield around to his back. A quick bit of grey stuff and a strap was created as well as the hand holding it. The skull was also quickly modeled with the remaining bit of grey stuff from the project.

Before and After


Brimmstorm!!!

Brimmstorm is one of the good ones in the local games community. He took me under his wing and introduced me to a lot of good folks around Madison. When his birthday came up, it was time to do something special and immortalize him in a little less than an inch high bit of grey epoxy. Now his wife can officially keep him under thumb. You're welcome, Brimmer.... and happy birthday!

This is an exact replication of Brimmer's
appearance before the case opens and someone gets hurt.